lunedì 20 maggio 2013

How to integrate Maven and Eclipse with m2e-wtp

Abstract

In this post I'll show you how to integrate Maven and Eclipse to develop web applications, using m2e-wtp. It is an Eclipse plugin that includes a set of connectors that help you to use all Maven features for Eclipse WTP projects. In the sections above, I'll show you how to install m2e-wtp and how to setup a new Dynamic Web Project with Maven in Eclipse Juno.

Requires

In order to install m2e-wtp, you must have previously installed Eclipse "for EE developers" 3.7+ version for you OS. Also, you need an active Internet connection to install the plugin from repository.

Installation

Before start, check the installation notes on m2e-wtp web site. If everything is ok, run Eclipse and select Help->Install New Software...
Click on the top right button "Add", Eclipse will show a dialog box called "Add Repository". Digit m2e-wtp in Name field and http://download.eclipse.org/m2e-wtp/releases/juno/ in Location field (http://download.eclipse.org/m2e-wtp/releases/kepler/ for Eclipse Kepler) and confirm by pressing the OK button (Fig 1)
Fig. 1

Now, select all elements in the list and then Next, in the "Install Details" window click Next, now accept the licence agreements and click Finish. Eclipse will download and install the plugin, if it shows a "Security Warning" window, don't mind and click on OK.
When it finish, restart Eclipse. Now you're ready to create a new project.

A new Project

Before creating a new project be sure to have a Tomcat server in Eclipse. If you don't, create a new one as described in this guide.
Also, if you are connected to the Internet by a proxy server, you must have a properly configured Maven installation.
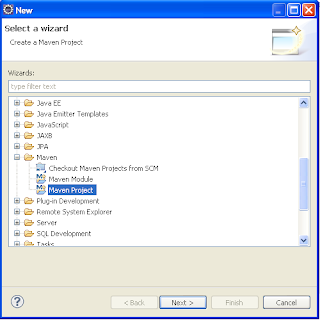
In order to create a new Dynamic Web Project, click on File menu, then New->Other, and select Maven->New Maven Project from the list and press Next (Fig 2).
Fig. 2

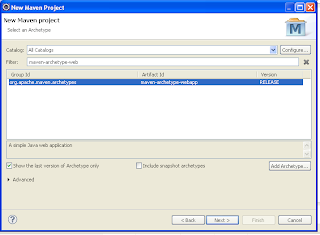
Leave the default configuration for the first screen. Now select the archetype: select "All Catalogs" in Catalog field, and search for "maven-archetype-webapp" and select it (Fig. 3)
Fig 3

then click Next. Now insert the project name, you have to insert both Group ID and Artifact ID fields (for more details about them read the Maven naming conventions). I used "test" for Group ID and "webapptest" for Artifact ID. Click Finish to create the project.
Now you have to add the server runtime library, right-click on the project name and select "Properties", then,  in the left tree, select "Java Build Path". Now select the "Libraries" tab, and click on the "Add Library..." button. Eclipse will pop-up a window, select "Server Runtime" and select your server; confirm clicking on Finish then Ok (Fig 4).
Fig. 4

As you can see, in "Java Resources" Eclipse added the server libraries and 2 folders:

  • src/test/java that contains junit classes
  • src/main/java that contains the project logic (e.i. beans, servlets and so on)
The configuration files (such as web.xml) and jsp views can be placed in "Deployed resources" -> webapp.
For more informations about maven folders read "Maven Standard Directory Layout".

Conclusions

In this post I showed you how to install m2e-wtp and how to create a new J2EE project with Maven. Now you're able to run the project as a normal "Dynamic Web Project" but with the Maven features.

mercoledì 8 maggio 2013

Creare web app con Eclipse e Maven grazie a m2e-wtp

Introduzione

In questo breve post descriverò la procedura per utilizzare Maven nei nostri progetti J2EE in Eclipse. Per permettere l'integrazione tra le due tecnologie, vi farò vedere come installare il plugin m2e-wtp. Grazie ad esso è possibile sfruttare tutte le potenzialità di Maven mantenendo la praticità dello sviluppo di web application in Eclipse. Nel dettaglio vi farò vedere come installare m2e-wtp in Eclipse Juno e come creare una nuova web application utilizzando un paio di piccoli accorgimenti utili per lo sviluppo.

Cosa serve

Per procedere con l'installazione di m2e-wtp è necessario avere una copia di Eclipse Juno (o superiore) "for EE developers" per il proprio sistema operativo, oltre a questo serve una connessione a Internet attiva per installare il plugin.

Installazione

Prima di installare m2e-wtp è meglio controllare le note di installazione sul sito ufficiale. Se abbiamo tutte le carte in regola, facciamo partire il nostro Eclipse e andiamo su Help -> Install New Software...
Dopo aver cliccato sul bottone in alto a destra "Add", ci apparirà una finestra "Add Repository"; qui aggiungiamo come "Name" m2e-wtp e come location http://download.eclipse.org/m2e-wtp/releases/juno/ (se state usando Eclipse Kepler 4.3 aggiungete invece http://download.eclipse.org/m2e-wtp/releases/kepler/ )(Fig 1)
Fig. 1

Selezionate tutti gli elementi che vi appariranno e cliccate su Next, dopo di che ancora Next al menù dei dettagli che vi apparirà dopo; accettate i termini di licenza e cliccate su Finish. Adesso non vi resta che aspettare che Eclipse scarichi i pacchetti e termini l'installazione.Durante la fase di installazione vi può apparire una finestra "Security Warning", nessun problema cliccate su OK.
Terminata l'installazione, riavviate Eclipse premendo Yes. Una volta riavviato siamo pronti per creare un nuovo progetto.

Nuovo progetto

Prima di creare un nuovo progetto, è bene assicurarsi di avere almeno un server in Eclipse, per la sua installazione e configurazione vi rimando a questa guida (in inglese).
Se vi connettete a Internet tramite un proxy, assicuratevi di avere Maven configurato come spiegato qui
Per creare la nostra web application con Maven, andiamo su File -> New -> Other, a questo punto Eclipse ci propone una lista, selezioniamo Maven -> New Maven Project (Fig 2)
Fig. 2

Premiamo Next, e ancora Next per la schermata successiva.
Adesso dobbiamo scegliere l'archetipo del nostro progetto, assicuriamoci di aver selezionato "All Catalogs" nel campo Catalog, inseriamo "maven-archetype-webapp" nel campo filtro, selezioniamo l'archetipo (Fig 3)
Fig. 3

e premiamo Next. Ora dobbiamo inserire il nome del nostro progetto, mettiamo come "Group id" test e come "Artifact Id" webapptest e quindi Finish.
Come avrete potuto notare, a differenza di Dynamic Web Project di WTP, in fase di creazione non abbiamo selezionato il server da cui recuperare le librerie di J2EE; per ovviare a questo problema clicchiamo col destro sul nome del progetto e scegliamo Properties, dal menù che appare a sinistra scegliamo "Java Build Path" e poi, nella finestra a destra "Libraries". Nella nuova schermata scegliamo "Add Library...", a questo punto ci troviamo davanti una finestra e selezioniamo "Server Runtime" (Fig. 4)
Fig. 4

Quindi premiamo Next e selezioniamo uno dei Server di Eclipse, confermiamo il tutto con Finish in questa finestra e Ok sulla schermata precedente. Oltre ad aggiungere la libreria, il sistema crea anche le cartelle src/test/java e src/main/java (come potete notare aprendo "Java Resources"), in quest'ultima andranno i sorgenti Java per la logica del nostro progetto (come beans, servlet ecc...).

Conclusione

In questa guida vi ho fatto vedere come installare e creare un nuovo progetto Maven che si integri perfettamente con WTP di Eclipse, grazie allo strepitoso plugin m2e-wtp. Da questo momento in poi possiamo usare il nostro progetto esattamente come un Dynamic Web Project, ma possiamo inserire, per esempio, le dipendenze grazie a Maven e risparmiarci un bel pò di lavoro!

lunedì 24 dicembre 2012

How to develop Android apps with Preferences

Abstract


In this post I'll show you how to develop an Android app to be able to accept user configurations throw the API Preferences. Using this API you can easy show, store and retreive user configurations, without care about how those informations are stored. As you will see, this is actually easy to do, just write an XML file and some bunch of Java code.

Before start


In order to show how Preferences works, I'll write a simple Android app that only shows the user configuration and open the configuration menù. This menù is made using only the layout files, without hard coding. In this example I'll use the SDK 11 (Honeycomb), beacause the older versions are not compatible.

What we need


For use Preferences, you don't need nothing but the Android SDK, because this API is integrated in it. So, if you don't have the IDE, download it from here.

Preferences.xml


The preferences options are stored in a XML file, just like a normal Activity layout file. Every option is identified by an android:key attribute, a string key that allow you to retrive the option value.
The root element is PreferenceScreen that define the menù option layout.
The option elements are:
  • CheckBoxPreference: a checkbox that rappresent a boolean value
  • EditTextPreference: shows a EditText of free-text string
  • ListPreference: shows a list of selectable items
  • MultiSelectListPreference: like the above, but allows user to select several items
  • RingtonePreference: shows a list of the ringtones from on the device
  • SwitchPreference: similar to CheckBoxPreference but shows a toggleable switch
You can also group the option throw a PreferenceCategory, for logically separate items. It also shows a title for the group.

Ready, steady, code!


Finally we are ready to code our preferences menù. First of all, lets define what options we want to show. For example I'll create a simple menù with a checkbox and an edittext in 2 different categories.
Well, check if res/xml directory exists (if not make it) and add a preferences.xml file. So, write the following code:
<?xml version="1.0" encoding="utf-8"?>
<PreferenceScreen
  xmlns:android="http://schemas.android.com/apk/res/android">

 <PreferenceCategory
   android:title="First PreferenceCategory">

  <CheckBoxPreference
    android:key="checkbox_preference"
    android:title="title checkbox preference"
    android:summary="summary of the checkbox preference" />
 </PreferenceCategory>

 <PreferenceCategory
   android:title="Second PreferenceCategory">

  <EditTextPreference
    android:key="edittext_preference"
    android:title="title edittext preference"
    android:summary="summary of the edittext preference"
    android:dialogTitle="dialog title edittext preference" />

 </PreferenceCategory>

</PreferenceScreen>


Then create a class that rappresent the menù. The class extends android.preference.PreferenceFragment, and it displays the menù itself. In the method onCreate we call addPreferencesFromResource to load graphical interface from the file preferences.xml, like so:
package com.blogspot.virtualinsanity106.preferences.fragments;

import com.blogspot.virtualinsanity106.preferences.R; //NOT android.R

import android.os.Bundle;
import android.preference.PreferenceFragment;
import android.util.Log;

public class PreferencesTest extends PreferenceFragment {
 private static final String TAG = "PreferencesTest";
 @Override
 public void onCreate(Bundle savedInstanceState) {
  super.onCreate(savedInstanceState);
  //create the fragment content from preferences.xml
  addPreferencesFromResource(R.xml.preferences);
  Log.d(TAG, "Content created");
 }
}


In order to store and display the user option, I'll create 2 activities: one, MainActivity, shows the user options and the other, SetPreferencesActivity, displays the menù and store the values.
The MainActivity layout file (res/layout/main.xml) has 2 TextView and a button for lunch the SetPreferencesActivity as follows:
<?xml version="1.0" encoding="utf-8"?>
<LinearLayout xmlns:android="http://schemas.android.com/apk/res/android"
 android:layout_width="match_parent"
 android:layout_height="match_parent"
 android:orientation="vertical" >
 <!-- this shows the edittext_preference preference -->
 <TextView
  android:id="@+id/textview_edittext"
  android:layout_width="match_parent"
  android:layout_height="wrap_content"
  android:text=""
  android:textAppearance="?android:attr/textAppearanceLarge" />
 <!-- this shows the checkbox_preference preference -->
 <TextView
  android:id="@+id/textview_checkbox"
  android:layout_width="match_parent"
  android:layout_height="wrap_content"
  android:text="" />
 <!-- this shows the SetPreferencesActivity activity-->
 <Button
  android:id="@+id/button_edit"
  android:layout_width="wrap_content"
  android:layout_height="wrap_content"
  android:text="@string/button_edit_label"
  android:onClick="onEditClick"/><!-- function to show the edit activity -->

</LinearLayout>

The SetPreferencesActivity layout file (res/layout/setpreferences.xml) shows the fragment created above and a button for come back to MainActivity, just like that:
<?xml version="1.0" encoding="utf-8"?>
<LinearLayout xmlns:android="http://schemas.android.com/apk/res/android"
 android:layout_width="match_parent"
 android:layout_height="match_parent"
 android:orientation="vertical" >
 <!-- this is the preferences fragment -->
 <fragment
  android:id="@+id/fragment_preferences"
  android:name="com.blogspot.virtualinsanity106.preferences.fragments.PreferencesTest"
  android:layout_width="match_parent"
  android:layout_height="wrap_content" />
 <!-- this is the "Back" button -->
 <Button
  android:id="@+id/button_back"
  android:layout_width="match_parent"
  android:layout_height="wrap_content"
  android:text="@string/button_back_label"
  android:onClick="onBackClick"/><!-- function to come back to the main activity -->

</LinearLayout>


Now create the 2 Java classes for the activities. The SetPreferencesActivity class create the content from the file setpreferences.xml and close itself on button back click, in this way:
package com.blogspot.virtualinsanity106.preferences;

import android.app.Activity;
import android.os.Bundle;
import android.view.View;

public class SetPreferencesActivity extends Activity {
 @Override
 protected void onCreate(Bundle savedInstanceState) {
  super.onCreate(savedInstanceState);
  setContentView(R.layout.setpreferences);
 }
 public void onBackClick(View v){
  setResult(RESULT_OK);
  finish();
 }
}

The MainActivity class provides to load the graphics from main.xml file, then load the user preferences at the boot. On the edit button click shows the SetPreferencesActivity and, then this one ends, reload the properties, as follows:
package com.blogspot.virtualinsanity106.preferences;

import android.os.Bundle;
import android.preference.PreferenceManager;
import android.util.Log;
import android.view.View;
import android.widget.TextView;
import android.app.Activity;
import android.content.Intent;
import android.content.SharedPreferences;

public class MainActivity extends Activity {
 private static final String TAG = "MainActivity";
 private TextView txtDisplayEditText;
 private TextView txtDisplayCheck;
 @Override
 protected void onActivityResult(int requestCode, int resultCode, Intent data) {
  loadPreferences(); //when the preferencesactivity ends, reload preferences when properties activity close
 }
 @Override
 protected void onCreate(Bundle savedInstanceState) {
  super.onCreate(savedInstanceState);
  setContentView(R.layout.main);//set the content from main.xml
 txtDisplayEditText = (TextView) findViewById(R.id.textview_edittext);
  txtDisplayCheck = (TextView) findViewById(R.id.textview_checkbox);
  loadPreferences();//load the edited preferences
 }
 public void onEditClick(View v){
  //open the properties activity
  Log.d(TAG, "Start edit");
  Intent intent = new Intent();
  intent.setClass(MainActivity.this, SetPreferencesActivity.class);
  startActivityForResult(intent, 0);
 }
 private void loadPreferences(){
  SharedPreferences sharedPreferences = PreferenceManager.getDefaultSharedPreferences(this); //load the preferences
  txtDisplayEditText.setText(sharedPreferences.getString("edittext_preference", getString(R.string.edittext_default_text))); //by default show the edittext_default_text string
  boolean isCheckboxSelected = sharedPreferences.getBoolean("checkbox_preference", false);//by default the checkbox isn't selected
  if(isCheckboxSelected)//if the checkbox is selected, show the "checkbox_true" string, otherwise show the "checkbox_false" string
   txtDisplayCheck.setText(getString(R.string.checkbox_true));
  else
   txtDisplayCheck.setText(getString(R.string.checkbox_false));
 }
}


Don't forget to add SetPreferencesActivity in your AndroidManifest.xml in order to correct display then, in this manner:
<activity android:name="SetPreferencesActivity"></activity>

Conclusions


In this post I showed you how to display and store an options menù in an Android app, and how read the user options throw the Preferences API. This API is included in the Android SDK, so we don't need to add jars in our project. In this post I had added some "non-option element" (like the Back button) in the menù without using a work-around for emulate the functions but just add that in the menù layout.
Some files are not included in this post, you can download the entire project here

martedì 18 dicembre 2012

Sviluppare un'applicazione Android con Preferences


Introduzione

In questo post spiegherò come sviluppare un'applicazione Android per permettere all'utente di configurare alcuni parametri tramite l'API Preferences. Con questa API si possono visualizzare e salvare alcune impostazioni editate dall'utente; impostazioni che possono essere recuperate in un secondo momento,
così da poter utilizzare questi dati per cambiare il comportamento della nostra
applicazione.

Premesse 

In questo post creerò un'applicazione Android che ha il semplice scopo di visualizzare i dati delle preferenze che l'utente ha editato. Inoltre farò vedere come creare un menù con l'elenco dei dati personalizzabili dall'utente, inserendo il tutto nei file di layout (cioé evitando di inserire le impostazioni nel codice Java).
Per l'usò che ne farò, l'SDK di riferimento sarà la 11 (Honeycomb) o successiva, inoltre parto dal fatto che sappiate già sviluppare semplici applicazioni Android.

Cosa Serve

Tutto ciò che serve per l'utilizzo di Preferences è già contenuto nell'SDK di Android, quindi non abbiamo bisogno d'altro che dell'IDE messo a disposizione da Google.

Preferences.xml


La definizione degli elementi da visualizzare nel menù di configurazione è contenuta
in un file xml, come avviene per le Activities. Ogni elemento editabile è identificato
dall'attributo android:key, una chiave di tipo String, tramite il quale possiamo
recuperare il valore inserito dall'utente.
L'elemento root di questo file è PreferenceScreen che definisce il layout vero e
proprio.
I singoli elementi di inserimento sono:
  • CheckBoxPreference: checkbox che rappresenta un valore booleano
  • EditTextPreference: visualizza un EditText per l'inserimento di un testo libero
  • ListPreference: visualizza una lista selezionabile dall'utente
  • MultiSelectListPreference: come la precedente, ma permette la selezione di più righe
  • RingtonePreference: permette la selezione di una suoneria presente sul dispositivo
  • SwitchPreference: simile a CheckBoxPreference, solo con l'effetto a "interruttore"
Oltre a questi è presente un elemento separatore, PreferenceCategory, che permette di raggruppare questi elementi, separandoli in base alla loro funzione logica.

Ready, steady, code!

Dopo l'infarinatura sulla natura del file preferences.xml, è finalmente giunto il momento di scrivere il codice per creare il menù di configurazione per la nostra applicazione. Per questo esempio creerò un semplice file composto da una checkbox e un editor di testo.
Nella cartella res/xml (che va creata se non presente) inseriamo il file preferences.xml così fatto:
<?xml version="1.0" encoding="utf-8"?>
<PreferenceScreen
  xmlns:android="http://schemas.android.com/apk/res/android">

 <PreferenceCategory
   android:title="First PreferenceCategory">

  <CheckBoxPreference
    android:key="checkbox_preference"
    android:title="title checkbox preference"
    android:summary="summary of the checkbox preference" />
 </PreferenceCategory>

 <PreferenceCategory
   android:title="Second PreferenceCategory">

  <EditTextPreference
    android:key="edittext_preference"
    android:title="title edittext preference"
    android:summary="summary of the edittext preference"
    android:dialogTitle="dialog title edittext preference" />

 </PreferenceCategory>

</PreferenceScreen>


Ora possiamo creare il menù delle opzioni vero e proprio.
Aggiungiamo una nuova classe al progetto che si occuperà di visualizzare il menù appena creato, per funzionare correttamente deve estendere android.preference.PreferenceFragment. Nel metodo onCreate specifichiamo la creazione del contenuto in base al file res/xml/preferences.xml così:

package com.blogspot.virtualinsanity106.preferences.fragments;

import com.blogspot.virtualinsanity106.preferences.R; //NOT android.R

import android.os.Bundle;
import android.preference.PreferenceFragment;
import android.util.Log;

public class PreferencesTest extends PreferenceFragment {
 private static final String TAG = "PreferencesTest";
 @Override
 public void onCreate(Bundle savedInstanceState) {
  super.onCreate(savedInstanceState);
  //create the fragment content from preferences.xml
  addPreferencesFromResource(R.xml.preferences);
  Log.d(TAG, "Content created");
 }
}


Ora creiamo gli xml per le due Activity.
La prima è quella principale (MainActivity), che si occupa di caricare e visualizzare le
preferenze dell'utente e visualizzare il menù di decodifica su richiesta dell'utente.
La seconda (SetPreferencesActivity) invece visualizza il fragment e torna all'Activity
principale.

Cominciamo dal file res/layout/main.xml che contiene 2 TextView per visualizzare i dati :

<?xml version="1.0" encoding="utf-8"?>
<LinearLayout xmlns:android="http://schemas.android.com/apk/res/android"
 android:layout_width="match_parent"
 android:layout_height="match_parent"
 android:orientation="vertical" >
 <!-- this shows the edittext_preference preference -->
 <TextView
  android:id="@+id/textview_edittext"
  android:layout_width="match_parent"
  android:layout_height="wrap_content"
  android:text=""
  android:textAppearance="?android:attr/textAppearanceLarge" />
 <!-- this shows the checkbox_preference preference -->
 <TextView
  android:id="@+id/textview_checkbox"
  android:layout_width="match_parent"
  android:layout_height="wrap_content"
  android:text="" />
 <!-- this shows the SetPreferencesActivity activity-->
 <Button
  android:id="@+id/button_edit"
  android:layout_width="wrap_content"
  android:layout_height="wrap_content"
  android:text="@string/button_edit_label"
  android:onClick="onEditClick"/><!-- function to show the edit activity -->

</LinearLayout>


Ora creiamo il file res/layout/setpreferences.xml, in modo da visualizzare il fragment e un bottone per tornare a MainActivity:

<?xml version="1.0" encoding="utf-8"?>
<LinearLayout xmlns:android="http://schemas.android.com/apk/res/android"
 android:layout_width="match_parent"
 android:layout_height="match_parent"
 android:orientation="vertical" >
 <!-- this is the preferences fragment -->
 <fragment
  android:id="@+id/fragment_preferences"
  android:name="com.blogspot.virtualinsanity106.preferences.fragments.PreferencesTest"
  android:layout_width="match_parent"
  android:layout_height="wrap_content" />
 <!-- this is the "Back" button -->
 <Button
  android:id="@+id/button_back"
  android:layout_width="match_parent"
  android:layout_height="wrap_content"
  android:text="@string/button_back_label"
  android:onClick="onBackClick"/><!-- function to come back to the main activity -->

</LinearLayout>

Ora passiamo alla creazione della parte Java delle activity. SetPreferencesActivity si occuperà semplicemente di creare il layout definito in setpreferences.xml alla creazione e di terminare l'activity al click del bottone, così:

package com.blogspot.virtualinsanity106.preferences;

import android.app.Activity;
import android.os.Bundle;
import android.view.View;

public class SetPreferencesActivity extends Activity {
 @Override
 protected void onCreate(Bundle savedInstanceState) {
  super.onCreate(savedInstanceState);
  setContentView(R.layout.setpreferences);
 }
 public void onBackClick(View v){
  setResult(RESULT_OK);
  finish();
 }
}

Mentre MainActivity si occupa di creare, al load,  il layout definito in main.xml e di caricare i dati salvati dall'utente. Quando si clicca sul bottone, l'applicazione visualizzerà l'activity SetPreferencesActivity e, terminata quest'ultima, ricaricherà i dati salvati dall'utente; così:

package com.blogspot.virtualinsanity106.preferences;

import android.os.Bundle;
import android.preference.PreferenceManager;
import android.util.Log;
import android.view.View;
import android.widget.TextView;
import android.app.Activity;
import android.content.Intent;
import android.content.SharedPreferences;

public class MainActivity extends Activity {
 private static final String TAG = "MainActivity";
 private TextView txtDisplayEditText;
 private TextView txtDisplayCheck;
 @Override
 protected void onActivityResult(int requestCode, int resultCode, Intent data) {
  loadPreferences(); //when the preferencesactivity ends, reload preferences when properties activity close
 }
 @Override
 protected void onCreate(Bundle savedInstanceState) {
  super.onCreate(savedInstanceState);
  setContentView(R.layout.main);//set the content from main.xml
 txtDisplayEditText = (TextView) findViewById(R.id.textview_edittext);
  txtDisplayCheck = (TextView) findViewById(R.id.textview_checkbox);
  loadPreferences();//load the edited preferences
 }
 public void onEditClick(View v){
  //open the properties activity
  Log.d(TAG, "Start edit");
  Intent intent = new Intent();
  intent.setClass(MainActivity.this, SetPreferencesActivity.class);
  startActivityForResult(intent, 0);
 }
 private void loadPreferences(){
  SharedPreferences sharedPreferences = PreferenceManager.getDefaultSharedPreferences(this); //load the preferences
  txtDisplayEditText.setText(sharedPreferences.getString("edittext_preference", getString(R.string.edittext_default_text))); //by default show the edittext_default_text string
  boolean isCheckboxSelected = sharedPreferences.getBoolean("checkbox_preference", false);//by default the checkbox isn't selected
  if(isCheckboxSelected)//if the checkbox is selected, show the "checkbox_true" string, otherwise show the "checkbox_false" string
   txtDisplayCheck.setText(getString(R.string.checkbox_true));
  else
   txtDisplayCheck.setText(getString(R.string.checkbox_false));
 }
}

Per finire, aggiungiamo SetPreferencesActivity nel AndroidManifest.xml con:
<activity android:name="SetPreferencesActivity"></activity>

Conclusione

In questo post abbiamo visto come visualizzare, salvare e recuperare le impostazioni dell'utente grazie all'API Preferences. Essendo un API integrata nel sistema non ha bisogno di aggiungere delle librerie esterne. Inoltre, aggiungendo il menù di configurazione tramite un xml di layout, è possibile inserire alcuni elementi estranei alla configurazione (nell'esempio il pulsante Back) senza dover utilizzare escamotage per simularne il funzionamento. Alcuni file, per ragioni di spazio, sono stati omessi; il progetto, completo di tutti i sorgenti è disponibile qui

mercoledì 13 giugno 2012

How to setup a PIC development environment in FreeBSD

Abstract

Setting up a Microchip's PIC microcontroller development environment in FreeBSD is very easy because most of the packages we need are already in the ports. In this post I'll show you which packages you should install in order to develop, compile and write your code into your microcontroller. Then I'll show you how to configure your IDE (Piklab) to compile applications and flash your PIC.
This isn't a C tutorial, if you are looking for a guide to learn how to program in C you may search on Google.

Warning

First of all, the use of pk2cmd in FreeBSD is "very experimental" (as you can read on ReadmeMakefile.txt file). Some features, such as multi-programmers support or firmware updates, are not supported or require a different OS . So please use it carefully.

Packages

The packeges required for setting up the environment are:
  • sdcc, a small c compiler for microcontrollers, is available in the ports
  • pk2cmd, the official Microchip programmer, can be downloaded here
  • Piklab, an IDE written in QT, is also present in the ports tree
In addition, there are some "hardware" requirements:
  • a PIC programmer, I used the Microchip's Pickit II
  • a development board or an ICSP circuit 
  • a PIC microcontroller (go figure!), in my case I used a PIC16F877A

Installation

The install phase requires root privileges in order to write files in system folders. By typing:
# cd /usr/ports/lang/sdcc && make install clean 
the port will install the SDCC compiler.
So, to fetch and install the Piklab type:
# cd /usr/ports/devel/piklab && make install clean 
pk2cmd isn't in the ports tree, so I had install it from a tarball. In the download directory, run:
tar xvf pk2cmdv1.20LinuxMacSource.tar.gz 
The next step will show you how to compile the source:
cd pk2cmdv1.20LinuxMacSource/ && gmake freebsd 
and to install, it run (root privileges required):
# gmake install

Configure

Now let's see how to configure the environment ,so that a non-root user can easily access to the PIC programmer. First of all, we had to configure devfs for read and write permissions in the USB devices.
As root, add the user to the operator group, typing:
# pw groupmod operator -m $USERNAME 
Edit the /etc/devfs.rules file (create it if it doesn't exist) and add these lines:
[system=10]
add path 'usb/*' mode 0660 group operator
To load the rules at the startup, add this line at /etc/rc.conf file
devfs_system_roleset = "system" 
Then restart devfs by running
# /etc/rc.d/devfs restart

Piklab is a complete IDE for microcontroller developing, but out-of-the-box it doesn't support Pickit II. Next step I'll show how to configure a custom programmer to use pk2cmd.
Run piklab and open Setting -> Configure Programmer, select  Custom Programmer and add these lines:
read pk2cmd -PPIC%DEVICE -B/usr/share/pk2/ -GF %O
erase pk2cmd -PPIC%DEVICE -B/usr/share/pk2/ -E
program pk2cmd -PPIC%DEVICE -B/usr/share/pk2/ -F %O -M
verify pk2cmd -PPIC%DEVICE -B/usr/share/pk2/ -F %O -Y
blank check pk2cmd -PPIC%DEVICE -B/usr/share/pk2/ -C
run pk2cmd -PPIC%DEVICE -B/sr/share/pk2/ -T
stop pk2cmd -PPIC%DEVICE -B/usr/share/pk2/ -R
save by clicking OK.
Create a new project (Project->New Project) as you can see in Fig.1
Fig.1 - New Project form
Now clicking on the project Piklab will open the project setting window, then select "Toolchain" tab. In "Compiler" add a new include folder writing:
/usr/local/share/sdcc/non-free/include/ 
in "Include directories", then click "Add" (Fig. 2)
Fig.2 - Compiler Tab
Select "Linker" tab and in "Custom options" write:
-L/usr/local/share/sdcc/non-free/lib/pic14 
Pay attention to the last folder's name, it is the PIC16F877A's folder. With other PICs it may be different.
Then save by pressing OK.
Fig.3 - Linker Tab

And that's all falks! Now Piklab is able to compile and store your programs on the microcontroller.

Conclusions

In this post I showed you how to set up a complete PIC development environment in FreeBSD. Piklab has some features that simplify your work. For example its "Config generator", available in "Tools" menu, generate the code to configure your PIC.

giovedì 7 giugno 2012

Programmare microcontrollori PIC su FreeBSD

Introduzione

In questo post vedremo come programmare microcontrollori PIC in ambiente FreeBSD. In particolare come configurare l'IDE Piklab per aiutarci a scrivere i programmi e flashare il PIC. Non mi soffermerò sulla parte di programmazione, quindi se cercate un buon corso di programmazione per PIC vi consiglio quello di settorezero. Se invece siete alla ricerca di una guida per le distro di Linux vi rimando al blog di Salvatore Salzano punti di (s)vista.

Premesse 

Prima di incominciare mi preme ricordare che l'uso di PK2CMD su FreeBSD, come potete leggere nel file ReadmeMakefile.txt, è "very experimental"; questo significa che non è stabile e alcune operazioni, come l'aggiornamento del firmware del pickit2 e l'utilizzo di più programmatori contemporaneamente, non sono supportate e/o vanno effettuate su altri OS.

Cosa ci serve

Per cominciare a programmare il nostro microcontrollore abbiamo bisogno di:
  1. un microcontrollore (of course), io ho provato con un PIC16F877A
  2. Pickit2: il programmatore originale Microchip, reperibile facilmente in Rete dai siti specializzati. Il prezzo si aggira intorno ai 30/40 euro
  3. sdcc : un compilatore C per microcontrollori, che potete trovare nei ports
  4. pk2cmd: programma per flashare il pic, scaricabile qui.
  5. Piklab: un IDE per la programmazione dei microcontrollori, anch'esso presente nei ports
Abbiamo inoltre bisogno di un circuito elettronico per collegare il Pickit2 al microcontrollore e quest'ultimo ai vari componenti. Io personalmente ho collegato il tutto con una breadboard seguendo lo schema fornito nella lezione 2 del corso di settorezero; comunque esistono anche schede di sviluppo facilmente reperibili in Rete (anche se dal costo abbastanza elevato).

Installazione

Procediamo con l'installazione dei programmi necessari. Per quanto riguarda sdcc non ci dovrebbero essere problemi, basta installarlo dai ports, da root lanciamo:
# cd /usr/ports/lang/sdcc && make install clean
Anche Piklab è presente nell'albero dei ports, per installarlo digitare:
# cd /usr/ports/devel/piklab && make install clean
Adesso installiamo pk2cmd, prima di tutto spostiamoci nella cartella dove lo abbiamo scaricato ed eseguiamo
tar xvf pk2cmdv1.20LinuxMacSource.tar.gz
Una volta scompattato il file compiliamolo con il comando:
cd pk2cmdv1.20LinuxMacSource/ && gmake freebsd
Se vogliamo installarlo dobbiamo ottenere i diritti di root e digitare
# gmake install
altrimenti possiamo utilizzare i binari dove si trovano. Ricordatevi che non essendo un port non può essere manipolato con gli strumenti messi a disposizione dal sistema operativo.

Configurazione dell'ambiente

Per poter utilizzare pk2cmd anche da utente non amministratore dobbiamo configurare devfs in modo opportuno. Prima di tutto aggiungiamo il nostro utente al gruppo operator
# pw groupmod operator -m $USERNAME
dove al posto di $USERNAME mettiamo il nome del nostro utente. Aggiungiamo al file /etc/devfs.rules (bisogna crearlo se non esiste) le seguenti linee
[system=10]
add path 'usb/*' mode 0660 group operator

poi editiamo /etc/rc.conf e aggiungiamo questa linea
devfs_system_roleset = "system"
ora ricarichiamo devfs con la nuova configurazione eseguendo
# /etc/rc.d/devfs restart
Ora passiamo alla configurazione vera e propria di Piklab, così da permetterci di sviluppare, compilare e flashare il dispositivo senza (quasi) l'uso della riga di comando. Inoltre permette di configurare i registri del dispositivo senza scrivere tonnellate di codice a mano.
Qui di seguito vado a riassumere quanto già scritto sulla guida di punti di (s)vista a proposito di Piklab, dopo di che spiegherò come configurare il compilatore e il linker per compilare i sorgenti del progetto.
Avviamo Piklab e spostiamoci su Settings-> Configure Programmer, selezioniamo Custom Programmer e inseriamo i seguenti comandi:
read pk2cmd -PPIC%DEVICE -B/usr/share/pk2/ -GF %O
erase pk2cmd -PPIC%DEVICE -B/usr/share/pk2/ -E
program pk2cmd -PPIC%DEVICE -B/usr/share/pk2/ -F %O -M
verify pk2cmd -PPIC%DEVICE -B/usr/share/pk2/ -F %O -Y
blank check pk2cmd -PPIC%DEVICE -B/usr/share/pk2/ -C
run pk2cmd -PPIC%DEVICE -B/sr/share/pk2/ -T
stop pk2cmd -PPIC%DEVICE -B/usr/share/pk2/ -R

e salviamo premendo OK.
Adesso creiamo un nuovo progetto da Project->New Project riempiamo la form che ci viene proposta come in Fig 1
Fig 1 - configurazione nuovo progetto
una volta creato il nuovo progetto, clicchiamo sull'icona del titolo ci apparirà una finestra con le opzioni del progetto, selezioniamo il tab "Toolchain". Nel tab "Compiler" aggiungiamo una nuova cartella degli include aggiungendo in "Include directories" la cartella
/usr/local/share/sdcc/non-free/include/
come riportato in Fig. 2
Fig. 2 - Aggiunta della nuova cartella di include
Ora spostiamoci su "Linker" e alla riga "Custom options" aggiungiamo:
-L/usr/local/share/sdcc/non-free/lib/pic14
se state utilizzando un pic diverso dal PIC16F877A, l'ultima cartella potrebbe cambiare, nel caso aggiungere la cartella esatta.
Fig. 3 - configurazione Linker
Ora non vi resta che scrivere il programma in C; per compilare il sorgente e flashare il microcontrollore basterà premere sugli appositi pulsanti messi a disposizione da Piklab.

Conclusioni

In questa guida abbiamo installato i programmi necessari alla programmazione dei microcontrollori PIC, poi abbiamo installato e configurato l'ambiente di sviluppo Piklab. Vi segnalo che sempre sulla guida di punti di (s)vista è presente un capitolo per automatizzare la configurazione dei registri del PIC utilizzando le funzionalità di Piklab.

lunedì 2 aprile 2012

How to develop iPhone apps on Ubuntu

Abstract

How many of you wish to develop iPhone apps without using a Mac? Well, after several tries, I finally found javacom/toolchan4. This project provides a simple script to install the iOS SDK on Ubuntu 10.10. In addition, it provides an integration with Theos suite.
In this guide I will show you how to prepare your computer for install iOS SDK 4.2 in Toolchan4 and how to upload your iPhone apps on your iDevice.

Before Start

As you can see, Toolchan4 works on Ubuntu 10.10. Although there's a workaround to work on Ubuntu's most recent versions, I will show you how to instal Ubuntu Maverick on Virtualbox. I choose this option to preserve my system, I’ll later show you what do I mean, and also because I don’t want to install an unsupported version.

Stuff


  • Virtualbox stuff
  1. Virtualbox installer for your favourite OS
  2. An Ubuntu 10.10 iso file
  • iOS SDK Installation stuff
  1. xcode_3.2.5_and_ios_sdk_4.2_final.dmg available on Apple Developer site (registration required) 
  2. Java Virtual Machine for Ubuntu (installable from the Ubuntu Software Centre)
  3. 7zip (available on  Ubuntu Software Centre). I will use it to unzip the .dmg file
  4. the cross-platform version of HFSExplorer (file .zip)
  • iPhone stuff
  1. a jailbreaked iPhone
  2. OpenSSH and Installous apps

Install Toolchan4

  • Setting Virtualbox
If you want to install Ubuntu 10.10 on VirtualBox, you can follow any guide you want. The only thing you need to mind is to configure your virtual machine network options. By default Virtualbox sets new virtual machines with "NAT network" option. This option lets the machine to connect to the Internet, but it denies the connection on local devices (even the iPhone). To permit virtual machine to access the iPhone, you have to go to virtual machine Settings then select Network and set "Attached to" to "Bridged Adapter" (Fig.1)
Fig. 1

See Virtalbox's manual (chapter 6) for more.

  • Extract the SDK from Xcode
Now we proceed extracting the SDK 4.2 file from Xcode. First of all we'll need to obtain the 5.hfs file from xcode_3.2.5_and_ios_sdk_4.2_final.dmg. To do that open a terminal (ctrl+alt+t) and run the following code into you download directory:
7z e xcode_3.2.5_and_ios_sdk_4.2_final.dmg 5.hfs

I don't mount the 5.hfs file directly in loopback, but I extract the SDK file using HFSExplorer.
At First search "java" in Ubuntu Software Centre and install the "Openjdk java 6 runtime" package. Now open a terminal in HFSExplorer directory and run the code
./runfsb.sh

In HFSExplorer go to Open -> Load filesystem from file and select the 5.hfs file. Now extract the PhoneSDK4_2.pkg in /Packages directory (Fig. 2)
Fig. 2


Follow the Toolchan4 guide on the project homepage (linked above). Pay attention to step 6, the guide rename some system files (as and ld), this is the reason why I choose to use a virtual machine.
Well, now you can compile an example project to test Toolchain4.


  • Deploy and install ipa package
Before starting, be sure you have OpenSSH and Installous installed. If you don't know how to install those apps, search on Google.
Now to get the iPhone IP address, go to Settings on your Springboard, then select Wi-fi. In "Wi-fi networks" find your network and press the blue circle with an arrow in it. Your iPhone's IP address will now be displayed .
Go back to Ubuntu and select Places -> Connect to server. In "Connect to server" ... select:
Server type: SSH
Server: the iPhone's address
User Name: root (password "alpine". It will be asked you on connection).(Fig. 3)
Fig. 3


When you are logged in search the folder /var/mobile/Documents/Installous/Downloads and copy the .ipa file. Then open Installous on your iPhone device, tap Downloads, select your file and install it.
That's all!


Conclusions

In this guide I showed you what files you have to download to install Toolchan4 and how to setup a virtual machine to deploy and install your iPhone apps. To date an Opensource graphical IDE for iPhone apps does not exist, then you just have to only write code by hand.

Marco "Mad Hatter"

P.S.

If you think you have tons of time to spare, can you please read this and point out the mistakes I did?